Wednesday, November 11, 2015

Marinated B-B-Q Lamb Chops - Greek Style & Super Delicious!

Easy Greek B-B-Q Lamb

This recipe is so simple to prepare and so tasty! The marinade compliments lamb perfectly. This is another of my mother's delicious recipes and I think you will love it as I do.

I prefer domestic lamb over imported lamb, by the way. I have some good friends who have lambing operations in Utah. I think the flavor of their lamb is better, plus I like supporting local businesses, don't you?


GREEK B-B-Q Lamb Recipe:

8 Lamb chops

Marinade:

1/4 c. Olive oil
1 lemon, juiced
2 to 4 Garlic cloves, crushed well
1 t. Dried oregano, crushed
1 t. Sea salt
1/2 t. Fresh ground black pepper
1/4 c. Water


Method:

Mix the marinade ingredients together and set aside.
Place 8 lamb chops in a heavy-duty Zip-Lock bag.
Pour the marinade over the lamb chops. Let the air out of the bag and seal.
Let marinate in your refrigerator 12 to 24 hours. Flip the bag over a couple times to evenly marinate.
Drain and grill  or broil the lamb to your liking.


Enjoy,

Leila

Tuesday, November 10, 2015

Hearty Buffalo Chili

Big Batch Buffalo Chile

I thought it was time that I post something rugged and manly. I would hate to be accused of posting only rabbit food recipes. So here you go. Pick yourself up by your boot straps and go find yourself some local ranch-raised buffalo and lamb, and you are ready to get cookin'.

This is one of those recipes that you plan for in advance. It is nice to make a big batch and then freeze some of it in meal-sized portions for easy lunches and dinners later. Don't let the list of ingredients throw you. It's very easy to make, it just needs simmering time between the steps. A few of the ingredients called for, may not be what you typically have in your pantry. And maybe you don't raise buffalo to eat, like we did. That's O.K., we see buffalo meat for sale at Costco and other places. You may have to use cubed beef and add buffalo hamburger, it just depends on what you can find. No worries, the recipe is flexible.

Why use buffalo meat? Buffalo meat has a terrific flavor! A lot of people like buffalo even better than beef. It is raised in a cleaner, healthier manner that cows typically are. It is leaner than beef too, so it is helpful to add some coconut oil when cooking to help it stay moist.

We also add some lamb for good measure. It helps to create nice depth of flavor. Our family raised some lambs too... Was it bad that we named them 'Lunch' and 'Dinner'?

So, create your shopping list and make sure you have all the ingredients you will need. Set aside time to tend to a simmering pot, and get ready to be showered with praise for serving this man-pleasing meal. Note: Women and children love this too.


BUFFALO CHILE Recipe:

Part A - Meat Mixture:

1 pound ground lamb
4 pounds buffalo meat, grind half of it and dice the rest into 1/2-inch cubes
1/4 to 1/2 c. coconut oil (deodorized 76 degree)
Rich buffalo broth (or beef broth)
1/2 c. red wine
1 bay leaf


Directions for Meat Mixture:

In a large stock pot, brown all of the meat in 1/4 c. to 1/2 c. coconut oil until it turns a nice medium-brown color.

Pour into the stock pot enough rich buffalo broth to go 1-inch over the top of the meat in the pan.

Pour in the stock pot 1/2 c. red wine and add 1 bay leaf.

Cook the meat until nearly tender.

Once the meat is nearly tender, follow the directions for part b - the sauce, below.


Part B - Sauce:

8 dried Pasilla chili peppers
8 mild dried red chilies
1 large can peeled, diced tomatoes
4 to 8 cloves garlic, smashed
1 small green bell pepper, minced
1 shredded corn tortilla (or omit for a paleo version)


Directions for Sauce:

Soak 8 dried Pasilla chili peppers and 8 mild dried red chilies in warm water until softened.

Remove stems and seeds and puree until very smooth.

Add to the simmering, nearly tender meat mixture.

Add the canned tomatoes, garlic, green pepper, and shredded corn tortilla.

Simmer together 1 hour.

Now proceed to part C, below.


Part C - Sauce Continued:

1 to 2 cans diced green chilies, to taste
1/4 t. ground cinnamon
1 T. ground cumin
1 T. dried oregano
1 T. onion powder
2 to 4 T. sweet paprika
2 T. xylitol (in place of 2 T. brown sugar)
4 cans (1 lb, 1-ounce) un-drained red kidney beans
Tapioca starch, to thicken
Sea salt, or BioSalt, to taste
Fresh ground pepper, to taste
A dash of smoke salt
2 T. green olive oil (or Green Oil recipe on this blog)


Directions to Finish the Chile:

To the Part B sauce that has simmered 1 hour, add  the first 8 ingredients.

Thicken the Chile with a mixture of tapioca starch dissolved in water.

Season to taste with salt and pepper.

Add a dash of smoke salt.

Simmer the Chile gently for 20 minutes more. Check the seasoning.

Take off the heat and add the green olive oil, to taste.

Let the Chile cool then refrigerate or freeze.

To serve: Reheat and garnish as desired.


Note: This chili is even better the next day.


Enjoy!

Leila

Sunday, November 8, 2015

Tiger Bites - A healthy raw coconut-apricot sugar-free candy

Tiger Bites - A Sugar-free Candy


I love these cute little confections.  My mom made a similar version of these but I didn't have her recipe, so I recreated this version of them. They are a perfect combination of sweet and tangy. The fresh citrus brightens the flavor and they have a delightful chewy texture. Best of all, they have no added sugar!

There are sorta-similar recipes out there using sweetened condensed milk and powdered sugar. They are flat tasting compared to these.

You can feel good about serving this great tasting, sugar-free and dairy-free version to your family!


TIGER BITES recipe:

1 1/2 c. (12 ounces) dried unsulphured organic California apricots
3 T. (1.5 ounces) Juice of 1/2 organic orange
Zest of 1/2 organic orange (0.50 ounces)
3 T. (1.5 ounces) fresh lime or lemon juice
1 T. (0.50 ounces) xylitol (or Lakanto zero-cal white granular sweetener)
1/4 t. BioSalt (recipe on this blog)
2 c. (4 ounces) dried unsweetened coconut chips
1 1/2 c. (3 ounces) unsweetened dried coconut, finely ground, for rolling


Method:

Snip the whole dried apricots into quarters and place in a bowl of a food processor.

Pour the orange juice, grated orange zest, lime or lemon juice, xylitol, and salt over the apricots.

Let the apricots soak while you prepare everything else, or about 5 minutes.

Place the finely ground coconut in a shallow bowl and set aside.

Place the BioSalt and half of the coconut chips into the food processor with the apricots.

Blend until the mixture until it starts to look chopped.

Add the rest of the coconut chips and process until it clumps into a mass.

Taste for sweetness and tartness. adjust if necessary.

Use a stainless steel 18/8-size ice cream/portion scoop to portion out half-ounce balls.

Drop the balls in the bowl of finely ground coconut and roll to completely cover the confection.

Seal air-tight and store in the refrigerator.


Note: I drop 4 or so balls at a time into the bowl of finely ground coconut, and then shake and roll  them about until well coated.


Enjoy the sweetness of life!


Leila.

Vanilla Creme Brulee Instant Pudding (No Cook, Low Glycemic, JELL-O Copy Cat Recipe)

This is a truly delicious instant no-cook pudding mix I created today, and it's lower glycemic too...


Vanilla Creme Brulee Instant Pudding.

This Vanilla Creme Brulee Instant Pudding is full-bodied and creamy. It has a decadent vanilla caramel flavor. You will be surprised that this is an instant pudding mix when you taste it! It is good enough to serve as a stand alone dessert.

This pudding has a secret, it is made with pure organic coconut palm sugar. Coconut palm sugar gives a nice caramel color, scent, and flavor to this pudding mix. It looks a lot like brown sugar, yet it is high in minerals like potassium and phosphorus. The thing that awesome about organic coconut sugar, is that it is a healthy, low glycemic alternative to other sugars like regular table sugar. It can also be used as a sweetener in beverages, desserts, and other recipes that call for regular cane sugar.

We make this pudding truly decadent by substituting some of the milk for cream, which just so happens to lower the carbs even further. Party.

Bonus: This is a true instant (no cook) pudding mix recipe you can use to replace the commercial 3.5 ounce boxed instant vanilla pudding mix called for in recipes. Party.

This is my second trial with no cook puddings. These instant pudding mixes will be evolving. I have plans to make instant protein puddings.

My goal: They have to taste good, like dessert, or I won't enjoy eating them much. I'd like to have a healthy pudding snack, say, before bed? Or maybe for breakfast. I have wanted to make delicious protein puddings/protein drink mixes for years. So now I'm going for it!

One hurdle has been how to get an instant pudding consistency without cooking it and without having to source ingredients only available to commercial food manufacturers. So this recipe is definitely progress. earlier I made a chocolate instant pudding that had a great consistency... I think I will post about my progress, then you can see how the instant pudding recipes evolve too.

See my first trial recipe of instant chocolate pudding too.


Vanilla Creme Brulee Instant Pudding & Pie Filling Mix:

3/4 c. (120 g) Organic Coconut Palm Sugar
6 T. (30 g) Ultra Gel Instant Non-GMO Modified Corn Starch (Cornaby's brand)
1 t. Lecithin granules (like Now brand)
1/8 t. (1 g) Sea salt or BioSalt (up to 2 g, to taste)


Method:

Grind the coconut sugar, Ultra Gel, lecithin powder and salt together 30 seconds until fine textured in a VitaMix blender. Let the dust settle before opening up the lid.

Store the pudding mix in an air-tight container.


To Prepare Pudding:

Liquid Ingredients:

1 3/4 c. organic whole milk
1/4 c. heavy cream
1 t. real vanilla extract
1/4 t. caramel flavoring (like Brickford brand), optional


Method:

Pour 1 3/4 cups cold milk into a mixing bowl.
Add 1/4 c. heavy cream to the milk (you may cut cream down to 2 T. and increase the milk by 2 T.).
Add 1 t. real vanilla extract and caramel flavoring, if using.
Add 1 recipe of Instant Pudding Mix above.
Using a hand mixer or whisk, blend for 2 minutes.
Let the pudding set up for 5 minutes in the refrigerator.


Photos of the process:

Organic Coconut Palm Sugar

Put the dry ingredients into a blender and grind fine, with the lid on!

Pour the wet ingredients into a mixing bowl and then add the pudding mix.

Whisk pudding ingredients together.

Adding the heavy cream to the pudding.

Whisk until smooth and glossy, and starting to thicken.

Pour into small serving dishes and chill at least 5 minutes to set up.

Top with sweetened whipped cream if desired.


Enjoy,

Leila.

D.I.Y. Instant (NO COOK) Chocolate Pudding & Pie Filling Mix (JELL-O Copy Cat) - Trial #1.

Here is a true instant chocolate pudding mix recipe you can use to replace commercial instant pudding mix.

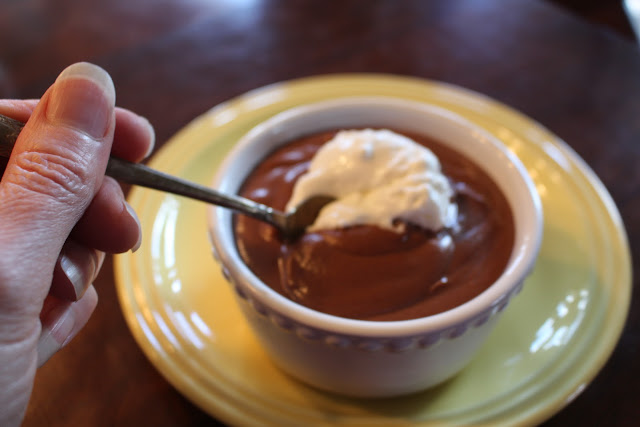
No Cook Chocolate pudding.

I have wanted to duplicate instant pudding mix for a while. I do not like buying boxed pudding mix. I do not care for the ingredients used in commercial mixes. I also know that it is more economical to make it yourself. I already have a collection of commercial dry pudding mix formulas for professional food manufacturers, I just do not care for their ingredient lists. Plus, it isn't feasible to use all of the specialty ingredients required in these professional formulas.

I wanted an easier way... A healthier way too. I still want it to taste good though.

There are several "Instant pudding Mix" recipes online already. However, when you look closely at the recipes, they are not instant puddings at all. They are the type of puddings that need to be cooked using conventional corn starch. I'm not sure how that is "Instant"...

Other online recipes also call for instant powdered milk along with the raw corn starch. I'm sorry, but generally I think powdered milk tastes not so great. And why do you need powdered milk when you are already adding the pudding mix to milk (and in some cases half milk and half cream)? Commercial instant pudding mixes do not have powdered milk in them, for example:

Ingredients of JELL-O brand Lemon Flavor Instant Pudding & Pie Filling (3.4 oz/96g):
Sugar
Modified Corn Starch
Contains less than 2% of:
Natural Flavor
Disodium Phosphate and Tetrasodium Pyrophosphate (for thickening)
Mono-and-Diglycerides (prevent foaming)
Yellow # 5
yellow # 6
BHA (preservative)

I wanted to create a real instant pudding mix formula, one that could be used in place of the boxed commercial instant pudding mixes. I wanted to be able to use healthier ingredients, and know exactly what goes into my food.

For birthdays, sometimes I like making cakes that call for a box of instant pudding mix. Conventional mixes for cooked pudding will not work because the starch in them is raw, and will not result in the same effect.

This recipe was my first attempt at making instant pudding. I am pleased with the results and will continue to 'tweak' this recipe.


Leila's Version of Instant Chocolate Pudding & Pie Filling Mix:

3/4 c. (150 g) Sugar
6 T. (30 g) Ultra Gel Instant Non-GMO Modified Corn Starch (Cornaby's brand)
1 t. (2 g) Lecithin granules (like Now brand)
1/4 t. (2 g) Sea salt or BioSalt, to taste
1/3 c. (30 g) dutch-processed cocoa powder


Method:

Grind the sugar, Ultra Gel, lecithin powder and salt together 30 seconds until fine textured in a Vitamix blender. Let the dust settle before opening up the lid.

Add the cocoa powder and grind 20 more seconds, or until the color is uniform throughout.

Store the pudding mix in an air-tight container.


To Prepare Pudding:

Pour 2 cups cold milk into a mixing bowl.
Add 2 T. heavy cream and 1 t. real vanilla extract.
Add 1 recipe of Instant Chocolate Pudding Mix.
Using a hand mixer or whisk, blend for 2 minutes.
Let the pudding set up for 5 minutes in the refrigerator.
Serve cold with sweetened whipped cream, if desired.


Tip: You can use vanilla sugar in place of the sugar and then omit the vanilla extract.


Note: See my recipe for Vanilla Creme Brulee Instant Pudding using coconut palm sugar!


Photos of the process:


Yummy...


Enjoy,

Leila.

Herb Flax Crackers - The 7th in a series of excellent Raw Food recipes

Herb Flax Crackers


I am posting a series of RAW FOOD RECIPES created by my mother Nancy Glazier and her good friend Irene Hauver. 

Together, as raw food pioneers, they complied an amazing collection of unique recipes that they used in teaching a series of raw-food-living un-cooking classes. We have a selection of delicious raw food recipes big enough to fill an entire cookbook. I know, cool, right?

These recipes are amazingly tasty! This is doing raw food right. Most raw food recipes are seriously lacking in taste and texture - well, not this collection. These beautiful ladies don't do anything half way! We are excited for you to try them.


Herb Flax Crackers are very handy to have in your pantry for when you need a speedy lunch or get the munchies. They have a delightful crunch and are SO healthy for you! Spread with Sunnie Sour Cream (recipe on this blog), Sunny Hummus (recipe on this blog), or other spread of choice.


HERB FLAX CRACKERS Recipe:

Ingredients:

4 cups Flax seeds, soaked in 8 cups water 8 hours (do not drain)
1/2 Onion, quartered
5 cloves Garlic
2 cups Chopped fresh herbs (chives, dill, sage, basil, oregano, parsley, kale, spinach, etc.)
2 t. Sea salt
1/4 cup Fresh lemon juice


Equipment:

Blender (like a VitaMix)
Food dehydrator with Teflex sheets for drying the crackers on
Bowl and spoon


Directions:

Combine onions, garlic, fresh herbs, salt, and lemon juice in blender. Puree until smooth. place in bowl.

Add 2 cups of soaked flax seeds and 1 1/2 cups water to blender. Puree until smooth. Pour into bowl with herb mixture.

Repeat with 2 more cups of soaked flax seeds.

Pour remaining whole soaked flax seeds into bowl with herb mixture and sir well to combine flavors.

Spread 2 cups of batter 3/8-inch thick on approx 8 Teflex Food dehydrator sheets.

Dry in a food dehydrator at 110 degrees for 8 hours. Flip onto screen.

Dry 12 more hours until crisp. Break into large cracker-sized pieces.

Store crackers in a pantry away from sunlight, in air-tight bags or bins. Fills an 8-quart size Zip-lock bag.

These crackers keep and store well.


Tips: 

The idea is to add just enough water to the soaked flax seeds in the blender to make a rough puree. This makes for crisper, thinner chips instead of just chewing on flax seeds stuck together. Use enough water to make it blendable in your blender.

Do not add an excess of water to soak the flax seeds - add just enough to make the mass like a thick batter. Then you can add water if needed during the pureeing process in your VitaMix blender. it's not like when we soak nuts in lots of water.

My mom always adds a bit of Vitamin C powder to her chips. It keeps her chips fresher tasting for longer, plus it keeps the colors lighter and brighter. Start with adding from 1/4 to 1/2 t. Vitamin C.


Note: Do not add more than the 2 t. sea salt asked for in this recipe. All dehydrated chips and crackers taste saltier once dried, because they are condensed, concentrating the salt.


Recipe created by the Kitchen Cheetahs, Nancy Glazier & Irene Hauver.


Enjoy!

Author, Leila Wood.

Neat Loaf - Seriously delicious! - The 6th in a series of excellent raw food recipes

Neat Loaf

I am posting a series of RAW FOOD RECIPES created by my mother Nancy Glazier and her good friend Irene Hauver. 

Together, as raw food pioneers, they complied an amazing collection of unique recipes that they used in teaching a series of raw-food-living un-cooking classes. We have a selection of delicious raw food recipes big enough to fill an entire cookbook. I know, cool, right?

These recipes are amazingly tasty! This is doing raw food right. Most raw food recipes are seriously lacking in taste and texture - well, not this collection. These beautiful ladies don't do anything half way! We are excited for you to try them.


Neat Loaf is a delicious, vegan, Raw Food version of Meatloaf. No, I mean it, It's delicious. Remember the Kitchen Cheetah's rule: if it's yucky - it's banned!

This recipe has been time-tested. My mom says that it makes a terrific vegan taco meat - Just crumble it and season with Mexican seasoning, then dehydrate it in a food dehydrator, until it is a "meaty" texture.

Make a big batch of this 'Neatloaf" and store in your freezer for quick meals later. It is a great food for cleansing diets, vegan, vegetarian, etc... Check all your ingredients if you are on a gluten-free diet.


RAW NEAT LOAF Recipe:

Ingredients:

1/2 c. Raw pecan (or filbert) butter

3/4 c. Wild rice (or rye), soaked and rinsed 2 days minimum (up to 4 days if kept cool), chopped. (Rice is very tough, it must be soaked and chopped into pieces before grinding with a CHAMPION Juicer.)

1/4 c. Lentils, soaked and sprouted 2 days and chopped

1/4 c. Sunflower seeds, soaked in water with a pinch of Vitamin C added, for 6 hours, then chopped

1/4 c. Dried tomatoes, soaked in 1 cup water till soft, and then chopped

1/2 c. Walnuts, soaked 8 hours and rinsed, and then chopped

1 c. Minced zucchini, partly dried in a food dehydrator, until "leathery"

2 T. Olive oil

1/2 c. Minced carrot

1/2 c. Minced celery

1/2 c. Minced parsley

1/2 c. "Sauteed Mushrooms and Onions"

1/2 c. Minced fresh basil

2 Green onions, minced

2 large Garlic cloves mashed with 1/2 t. sea salt

2 T. Tahini

2 T. Shoyu

2 T. Nutritional yeast flakes

2 T. Ground flax seeds

2 T. Walnut oil (or olive oil)

2 t. Sweet paprika

1 T. Miso

1 t. Fresh minced rosemary (optional)

1/4 t. Ground white pepper

1/2 to 1 t. Sea salt (to taste)

2 t. Guar gum (if making veggie burgers)


Equipment:

Champion Juicer
Knife and chopping block or food processor
Large bowl and spoon
Food dehydrator


Directions:

Mix pecan butter and chopped wild rice together.

Process through a CHAMPION JUICER until creamy.

Place the rest of the ingredients in a bowl with the rice and pecan butter. Stir well.

Taste for flavor. Adjust if necessary.

shape into 10, 1/2-cup loaves on food dehydrator screens. Dry at 110 degrees about 6 hours.

Serve warm with olive oil, ketchup, or BBQ sauce drizzled on top.

Makes approximately 10 loaves. Freezes and reheats well.


Helpful hint: Make the "Neatloaf" one day, chill. Form the loaves and dry them the next day.


Recipe created by the Kitchen Cheetahs, Nancy Glazier & Irene Hauver.


Enjoy!

Author, Leila Wood.